
This is a component one in a chain of 2 portions. Partially 1, I can provide an explanation for methods to keep an eye on any instrument the usage of a smartphone or voice instructions from Google Assistant or Alexa. Section 2 will provide an explanation for methods to use gestures to keep an eye on any house home equipment the usage of Laptop Imaginative and prescient and Raspberry Pi.
Section 1
Why would you wish to have to automate?
- Saves time
- A lot more environment friendly
- Talent to keep an eye on any instrument from any place on the earth
- Insanely helpful for lazy chaps like me
Pieces Wanted:
- ESP8266-Node MCU (Microcontroller) ($2 in aliexpress)
- Breadboard energy provide or some other 5V supply ($zero.71 in aliexpress)
- Relay board — (2 channel, four channel, eight channel in line with your wishes) ($1 in aliexpress)
- Jumper Wires (Feminine to Feminine) (underneath $1 in aliexpress)
Taking a Have a look at the Required Parts
Relay Board
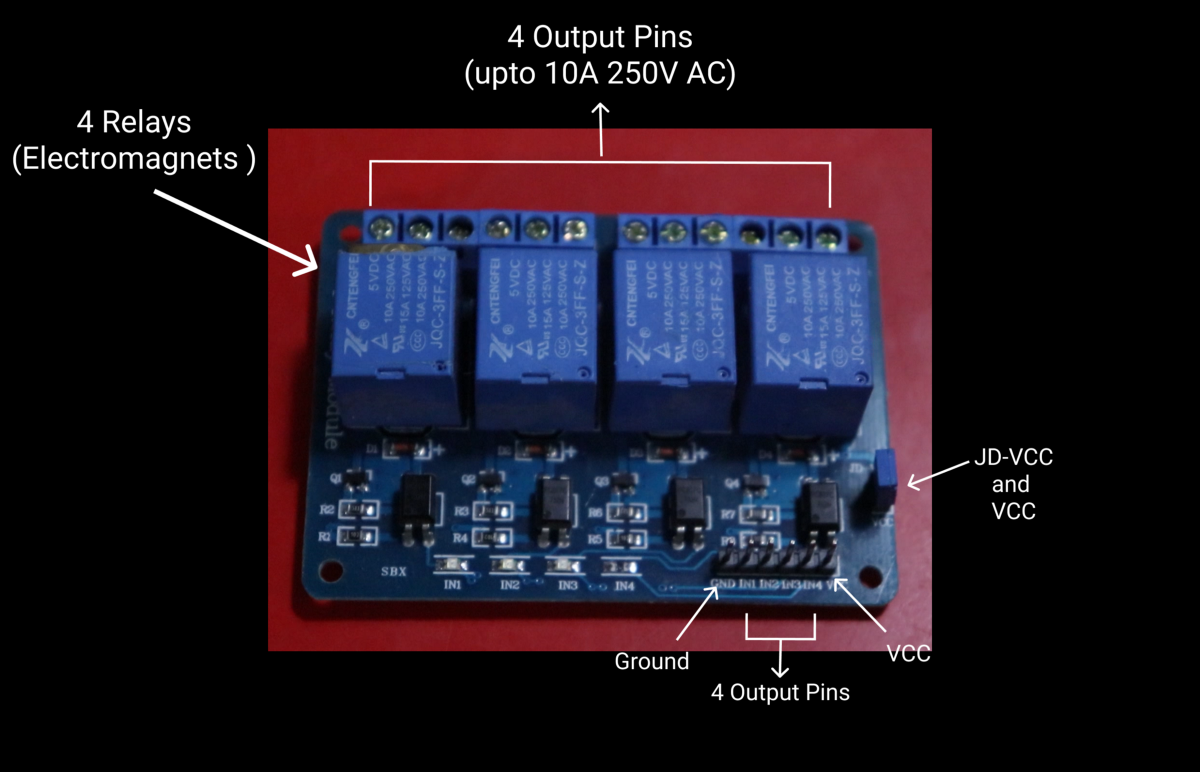
The Relay Board makes use of electromagnets to make and damage the circuits. This one right here 4 four channels, however you’ll be able to simply purchase as much as 16 channels. The choice of channels method the choice of gadgets you’ll be able to attach directly. This relay can care for as much as 10A 250V AC. There are 4 enter pins (IN 1–four) to keep an eye on 4 relays. You’ll be able to use Node-MCU to energy the board, however this can be a just right concept to isolate the board from the micro-controller, to try this attach voltage pin from Node-MCU to VCC and separate 5V energy provide to JD-VCC and GND.
That is the place the breadboard energy provide is available in.
Breadboard Energy Provide
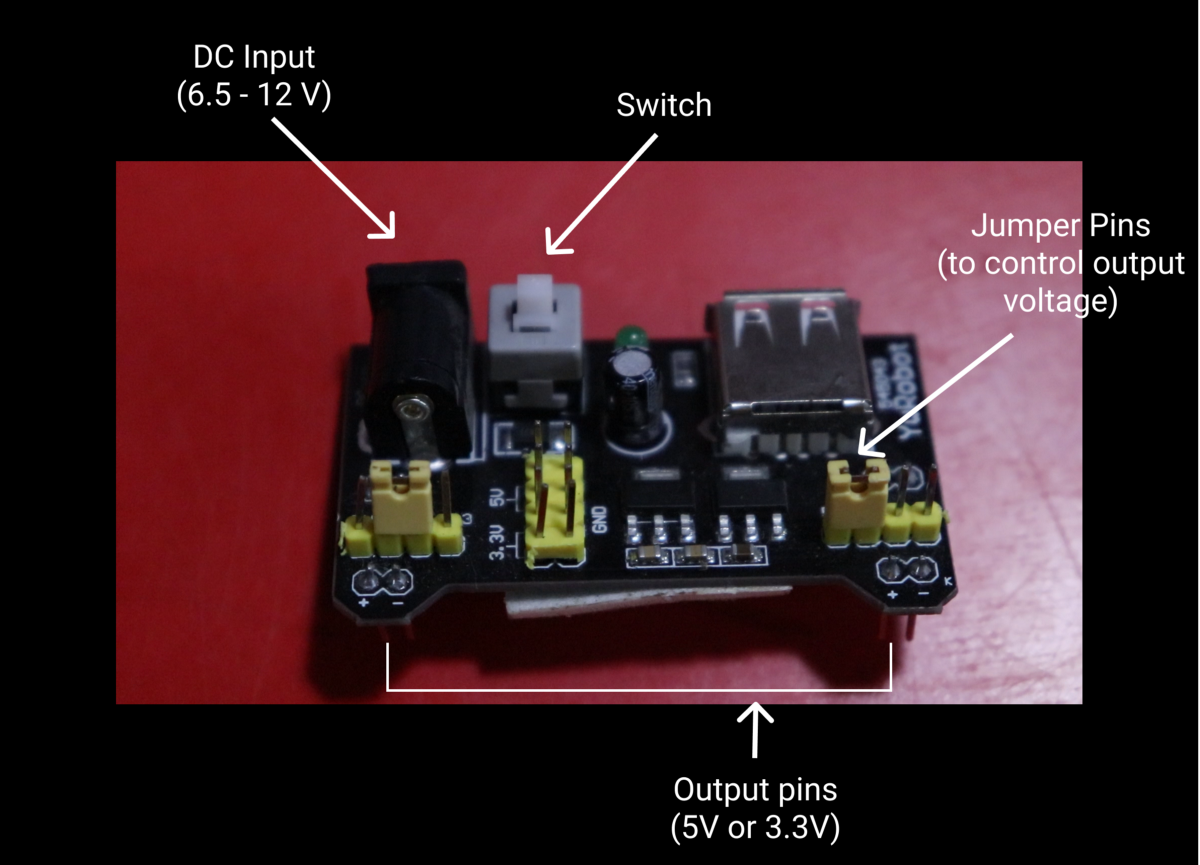
The breadboard energy provide can output 5V, three.3V, or each. There are two output pins and two jumper pins to set the configuration. It calls for 6.5V–12V to serve as. In case you are the usage of each the pins, use the 12V enter to maintain voltage drops. You’ll be able to additionally energy it the usage of USB. There’s a transfer to show off and on the instrument.
ESP8266 Node MCU (Microcontroller)

There’s a lot to mention about Node MCU, however I can stick with the main points associated with this venture.
There are 16 GPIO pins in Node MCU, which is able to obtain and ship indicators. Node MCU can keep in touch with different APIs and gadgets the usage of WiFi. Node MCU required three.three V to energy up and it may be performed so the usage of Micro-USB or Vin and GND pins. You’ll be able to use pins from D1 to D8 to ship indicators to the relay board. We will use Arduino IDE to program Node MCU and use Blynk to ship instructions the usage of our telephone. We will then attach Blynk to IFTTT to glue it to Google Assistant.
Now, let’s attach!
Connecting the Items
Step 1 — Programming Node MCU
First, we wish to program the Node MCU. The Node MCU connects to Blynk, an IoT platform, which is able to ship instructions from smartphone to Node MCU.
Remember to have Arduino IDE put in. Now we wish to upload our Node MCU board to the Arduino board supervisor. To try this, cross to Arduino > Personal tastes and paste the next:
https://arduino.esp8266.com/strong/package_esp8266com_index.json
in “Further Forums Supervisor URL’s”, and press adequate. Now cross to forums supervisor, seek “esp8266”, and set up.
Subsequent, click on on Equipment > forums > ESP8266 forums > Node MCU 1.zero (ESP-12E Module). Paste the above code in Arduino IDE, put your authentication code right here.
char auth[] = “PUT YOUR AUTHENTICATION CODE HERE”;
To search out the authentication code, use the next directions:
Open Blynk app and create your account. Create a brand new venture and make a choice Node MCU because the instrument, select the relationship sort as WiFi then click on on create. This may ship the auth token on your mail. For extra main points observe this-Getting Began.
After all, put your WiFi SSID right here:
char ssid[] = “YOUR WIFI”;
and your WiFi password right here:
char go[] = “WIFI PASSWORD”;
That’s all you want to do to keep an eye on Node MCU.
Step 2 — Wiring The entirety

The above schematic presentations the wiring of every element. D1-D4 pins in Node MCU are plugged within the relay board from In1to In4. three.3V pin of Node MCU is going to VCC within the relay board. Take two wires and put each in 5V configuration of breadboard energy provide, attach detrimental to GND, and certain to JD-VCC of the relay board, respectively. To energy Node MCU you’ll be able to both use micro-USB or use the second one output of breadboard in three.three V configuration. Attach the certain cord to Vin and detrimental to GND in NodeMCU, respectively. To energy breadboard energy provide use a 12V DC adapter. Attach the wires of the applying to the relay as proven above.
Step three — Connecting to Blynk
This would be the remaining step in the event you simply wish to keep an eye on your gadgets the usage of your telephone and don’t care about voice popularity.
Within the Blynk app drag four buttons at the primary window and alter the pin mode in every of the buttons to a virtual pin from one to 4, For D1 to D4 on Node MCU. In case you are the usage of different GPIO pins then select the ones pins.
That’s it! Now you’ll be able to keep an eye on gadgets the usage of your telephone.
Step four — Voice Activation
To make use of voice popularity, we wish to use IFTTT. IFTTT bridges the space between Blynk and Google Assistant. You’ll be able to even use Alexa.
Create your IFTTT account and click on on My Applets > create applets. There shall be a large button announcing “If This Then That”
Make a choice the “This” button after which make a choice Google assistant and click on on attach. Now to create a voice command, click on on “say a easy word”, fill within the textual content field in line with your wishes.
Now click on on “That” and select webhooks and click on on attach. This may let us keep in touch with Blynk. At the URL choice sort the underneath URL, take into account to place your Blynk auth key there:
http://188.166.206.43/yourauthkey/replace/D1
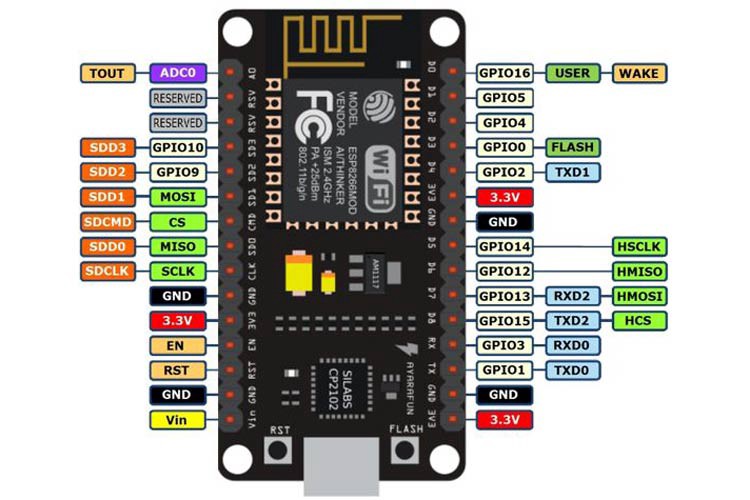
Alternate the D1 on your pin of Node MCU to the corresponding pin above. Ex if you’re the usage of D1 of Node MCU, sort D5 within the URL, if you’re the usage of D2 of Node MCU sort D4. Use the picture above to seek out the right kind price. It is because Blynk thinks that it’s connecting to the Arduino UNO board and the above symbol is the conversion of Node MCU to Arduino UNO pins.
Alternate the ‘Manner’ approach to PUT, ‘Content material Sort’ as software/json, and within the ‘Frame’ sort
[“0”] //This implies activate
In a similar fashion, create every other applet to show off the instrument and as an alternative of hanging
[“0”] sort [“1”]
Now you’ll be able to do the similar for the opposite three home equipment.
That’s it! Now you will have extra keep an eye on over your own home, you’ll be able to keep an eye on the rest you wish to have from any place on the earth for not up to $10.


